Many apps need to do background processing outside of the context of a
web request. This tutorial creates a web app that lets users input text
to translate, and then displays a list of previous translations. The translation
is done in a background process to avoid blocking the user's request.
The following diagram illustrates the translation request process.
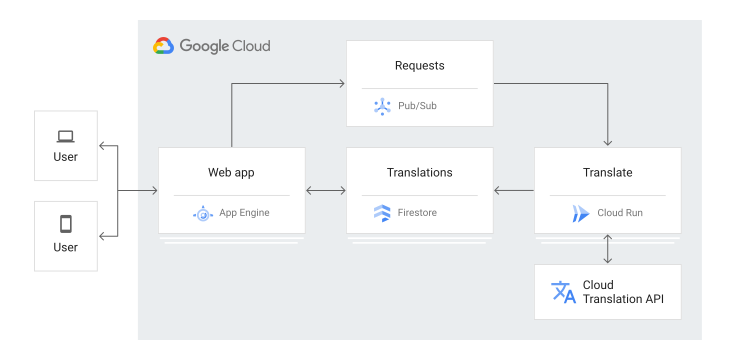
Here is the sequence of events for how the tutorial app works:
1. Visit the web page to see a list of previous translations, stored in Firestore.
2. Request a translation of text by entering an HTML form.
3. The translation request is published to Pub/Sub.
4. A Cloud Run app receives the Pub/Sub message.
5. The Cloud Run app uses Cloud Translation to translate the text.
6. The Cloud Run app stores the result in Firestore.
This tutorial is intended for anyone who is interested in learning about
background processing with Google Cloud. No prior experience is
required with Pub/Sub, Firestore, App Engine, or
Cloud Run. However, to understand all of the code, some experience with
PHP, JavaScript, and HTML is helpful.
## Objectives
- Understand and deploy Cloud Run services.
- Understand and deploy an App Engine app.
- Try the app.
## Costs
In this document, you use the following billable components of Google Cloud:
- [Cloud Run](https://docs.cloud.google.com/run/pricing)
- [App Engine](https://docs.cloud.google.com/appengine/pricing)
- [Firestore](https://docs.cloud.google.com/firestore/pricing)
- [Pub/Sub](https://docs.cloud.google.com/pubsub/pricing)
- [Cloud Translation](https://docs.cloud.google.com/translate/pricing)
To generate a cost estimate based on your projected usage,
use the [pricing calculator](https://docs.cloud.google.com/products/calculator).
New Google Cloud users might be eligible for a [free trial](https://docs.cloud.google.com/free).
When you finish the tasks that are described in this document, you can avoid
continued billing by deleting the resources that you created. For more information, see
[Clean up](https://docs.cloud.google.com/php/getting-started/background-processing.md.txt#clean-up).
## Before you begin
1.
In the Google Cloud console, open the app in [Cloud Shell](https://docs.cloud.google.com/shell).
[Go to Cloud Shell](https://docs.cloud.google.com/console/cloudshell/open?git_repo=https://github.com/GoogleCloudPlatform/getting-started-php&working_dir=background-processing)
Cloud Shell provides command-line access to your cloud resources directly from the
browser. Open Cloud Shell in your browser and click **Proceed** to download the
sample code and change into the app directory.
2. In Cloud Shell, configure the `gcloud` tool to use your Google Cloud project:
```bash
# Configure gcloud for your project
gcloud config set project YOUR_PROJECT_ID
```
## Understanding the Cloud Run backend
You define a single PHP function `translateString`, and configure your
Cloud Run service to respond to a Pub/Sub message
by invoking this function.
```php
use Google\Cloud\Firestore\FirestoreClient;
use Google\Cloud\Firestore\Transaction;
use Google\Cloud\Translate\TranslateClient;
/**
* @param array $data {
* The PubSub message data containing text and target language.
*
* @type string $text
* The full text to translate.
* @type string $language
* The target language for the translation.
* }
*/
function translateString(array $data)
{
if (empty($data['language']) || empty($data['text'])) {
throw new Exception('Error parsing translation data');
}
$firestore = new FirestoreClient();
$translate = new TranslateClient();
$translation = [
'original' => $data['text'],
'lang' => $data['language'],
];
$docId = sprintf('%s:%s', $data['language'], base64_encode($data['text']));
$docRef = $firestore->collection('translations')->document($docId);
$firestore->runTransaction(
function (Transaction $transaction) use ($translate, $translation, $docRef) {
$snapshot = $transaction->snapshot($docRef);
if ($snapshot->exists()) {
return; // Do nothing if the document already exists
}
$result = $translate->translate($translation['original'], [
'target' => $translation['lang'],
]);
$transaction->set($docRef, $translation + [
'translated' => $result['text'],
'originalLang' => $result['source'],
]);
}
);
echo "Done.";
}
```
1. The function must import several dependencies in order to connect with
Firestore and Translation.
```php
use Google\Cloud\Firestore\FirestoreClient;
use Google\Cloud\Firestore\Transaction;
use Google\Cloud\Translate\TranslateClient;
```
2. Cloud Run starts by initializing the Firestore
and Pub/Sub clients. Then, it parses the Pub/Sub
message data to get the text to translate and the desired target language.
```php
$firestore = new FirestoreClient();
$translate = new TranslateClient();
$translation = [
'original' => $data['text'],
'lang' => $data['language'],
];
```
3. The Translation API is used to translate the string to the
desired language.
```php
$result = $translate->translate($translation['original'], [
'target' => $translation['lang'],
]);
```
4. The function comes up with a unique name for the translation request to make
sure we don't store any duplicate translations. Then, it translates in a
Firestore transaction to make sure concurrent executions don't
accidentally run the same translation twice.
```php
$docId = sprintf('%s:%s', $data['language'], base64_encode($data['text']));
$docRef = $firestore->collection('translations')->document($docId);
$firestore->runTransaction(
function (Transaction $transaction) use ($translate, $translation, $docRef) {
$snapshot = $transaction->snapshot($docRef);
if ($snapshot->exists()) {
return; // Do nothing if the document already exists
}
$result = $translate->translate($translation['original'], [
'target' => $translation['lang'],
]);
$transaction->set($docRef, $translation + [
'translated' => $result['text'],
'originalLang' => $result['source'],
]);
}
);
```
## Building and Deploying the Cloud Run backend
- Build the Cloud Run app in the `backend` directory:
```bash
gcloud builds submit backend/ \
--tag gcr.io/PROJECT_ID/background-function
```
- Deploy the Cloud Run app using the image tag from the previous
step:
```bash
gcloud run deploy background-processing-function --platform managed \
--image gcr.io/PROJECT_ID/background-function --region REGION
```
Where `REGION` is a
[Google Cloud region](https://cloud.google.com/compute/docs/regions-zones/).
- When your deployment finishes, you will see a URL for your deployed app in the
command output. For example:
```
Service [background-processing-function] revision [default-00002-vav] has been deployed and is serving 100 percent of traffic at https://default-c457u4v2ma-uc.a.run.app
```
Copy this URL for the next step.
## Setting up the Pub/Sub subscription
Your Cloud Run app will receive messages from
Pub/Sub whenever a message is published to the topic `translate`.
A built-in authentication check ensures the Pub/Sub message
contains a valid authorization token from a service account which has permission
to invoke your Cloud Run backend.
The next steps walk you through setting up the Pub/Sub topic,
subscription, and service account for making authentiated calls to your
Cloud Run backend. Read more about this integration in
[Authenticating service-to-service](https://cloud.google.com/run/docs/triggering/pubsub-push).
1. Create the topic `translate` for publishing new translation requests:
```php
gcloud pubsub topics create translate
```
2. Enable your project to create Pub/Sub authentication tokens:
```bash
gcloud projects add-iam-policy-binding PROJECT_ID \
--member=serviceAccount:service-PROJECT_NUMBER@gcp-sa-pubsub.iam.gserviceaccount.com \
--role=roles/iam.serviceAccountTokenCreator
```
Where `PROJECT_NUMBER` is your Google Cloud project number,
which can be found by running
`gcloud projects describe PROJECT_ID | grep projectNumber`.
3. Create or select a [service account](https://docs.cloud.google.com/iam/docs/understanding-service-accounts)
to represent the Pub/Sub subscription identity.
```bash
gcloud iam service-accounts create cloud-run-pubsub-invoker \
--display-name "Cloud Run Pub/Sub Invoker"
```
**Note** : You can use `cloud-run-pubsub-invoker` or replace with a name
unique within your Google Cloud project.
4. Give the invoker service account permission to invoke your `background-processing-function` service:
```bash
gcloud run services add-iam-policy-binding background-processing-function \
--member=serviceAccount:cloud-run-pubsub-invoker@PROJECT_ID.iam.gserviceaccount.com \
--role=roles/run.invoker --platform managed --region REGION
```
It can take several minutes for the Identity and Access Management changes to propagate. In the meantime
you might see `HTTP 403` errors in the service logs.
5. Create a Pub/Sub subscription with the service account:
```bash
gcloud pubsub subscriptions create run-translate-string --topic translate \
--push-endpoint=CLOUD_RUN_URL \
--push-auth-service-account=cloud-run-pubsub-invoker@PROJECT_ID.iam.gserviceaccount.com
```
Where `CLOUD_RUN_URL` is the HTTPS URL you copied after
[building and deploying your backend](https://docs.cloud.google.com/php/getting-started/background-processing.md.txt#building_and_deploying_the_backend).
The `--push-account-service-account` flag activates the Pub/Sub push
functionality for [Authentication and authorization](https://docs.cloud.google.com/pubsub/docs/push.md.txt#authentication_and_authorization).
Your Cloud Run service domain is automatically registered for use
with Pub/Sub subscriptions.
## Understanding the app
There are two main components for the web app:
- A PHP HTTP server to handle web requests. The server has the following two endpoints:
- `/`: Lists all of the existing translations and shows a form users can submit to request new translations.
- `/request-translation`: Form submissions are sent to this endpoint, which publishes the request to Pub/Sub to be translated asynchronously.
- An HTML template that is filled in with the existing translations by the PHP server.
### The HTTP server
- In the `app` directory, `index.php` starts by setting up the
[Lumen](https://lumen.laravel.com/)
app and registering HTTP handlers:
```php
$app = new Laravel\Lumen\Application(__DIR__);
$app->router->group([
], function ($router) {
require __DIR__ . '/routes/web.php';
});
$app->run();
```
- The index handler (`/`) gets all existing translations from
Firestore and renders a template with the list:
```php
/**
* Homepage listing all requested translations and their results.
*/
$router->get('/', function (Request $request) use ($projectId) {
$firestore = new FirestoreClient([
'projectId' => $projectId,
]);
$translations = $firestore->collection('translations')->documents();
return view('home', ['translations' => $translations]);
});
```
- The request translation handler, registered at `/request-translation`, parses
the HTML form submission, validates the request, and publishes a
message to Pub/Sub:
```php
/**
* Endpoint which publishes a PubSub request for a new translation.
*/
$router->post('/request-translation', function (Request $request) use ($projectId) {
$acceptableLanguages = ['de', 'en', 'es', 'fr', 'ja', 'sw'];
if (!in_array($lang = $request->get('lang'), $acceptableLanguages)) {
throw new Exception('Unsupported Language: ' . $lang);
}
if (!$text = $request->get('v')) {
throw new Exception('No text to translate');
}
$pubsub = new PubSubClient([
'projectId' => $projectId,
]);
$topic = $pubsub->topic('translate');
$topic->publish(['data' => json_encode([
'language' => $lang,
'text' => $text,
])]);
return '';
});
```
### The HTML template
The HTML template is the basis for the HTML page shown to the user so they can
see previous translations and request new ones. The template is filled in by the
HTTP server with the list of existing translations.
- The `` element of the HTML template includes metadata, style sheets, and JavaScript for the page:
The page pulls in
[Material Design Lite (MDL)](https://getmdl.io/)
CSS and JavaScript assets. MDL lets you add a
[Material Design](https://material.io/design/)
look and feel to your websites.
The page uses
[JQuery](https://jquery.com/)
to wait for the document to finish loading and set a form submission handler.
Whenever the request translation form is submitted, the page does minimal form
validation to check that the value isn't empty, and then sends an asynchronous
request to the `/request-translation` endpoint.
Finally, an
[MDL snackbar](https://getmdl.io/components/#snackbar-section)
appears to indicate if the request was successful or if it encountered an error.
- The HTML body of the page uses an [MDL layout](https://getmdl.io/components/index.html#layout-section) and several [MDL components](https://getmdl.io/components/index.html) to display a list of translations and a form to request additional translations:
```php
```
## Running the app in Cloud Shell
Before trying to deploy the web app, install the dependencies and run it
locally.
1. First, install the dependencies with [Composer](https://getcomposer.org).
The [gRPC extension for PHP](https://docs.cloud.google.com/php/grpc) is required, and is pre-installed on
Cloud Shell.
```php
composer install -d app
```
2. Next, run the PHP built-in web server to serve your app:
```php
APP_DEBUG=true php -S localhost:8080 -t app
```
The `APP_DEBUG=true` flag will display any exceptions that occur.
3. In Cloud Shell, click **Web preview**
,
and select **Preview on port 8080**. This opens a new window with your
running app.
## Deploying the web app
You can use the
[App Engine standard environment](https://docs.cloud.google.com/appengine/docs/standard/php)
to build and deploy an app that runs reliably under heavy load and with large amounts of data.
This tutorial uses the App Engine standard environment to deploy the HTTP frontend.
The `app.yaml` configures the App Engine app:
```yaml
runtime: php73
env_variables:
APP_DEBUG: true
LOG_CHANNEL: stderr
APP_STORAGE: /tmp
```
- From the same directory as the `app.yaml` file, deploy your app to the App Engine standard environment:
```
gcloud app deploy
```
## Testing the app
After you've deployed the Cloud Run function and App Engine app, try
requesting a translation.
1.
To view the app in your browser,enter the following URL:
`https://PROJECT_ID.REGION_ID.r.appspot.com`
Replace the following:
- `PROJECT_ID`: Your Google Cloud project ID
- `REGION_ID`: A [code that
App Engine assigns to your app](https://docs.cloud.google.com/appengine/docs/standard/python/how-requests-are-routed#region-id)
There is a page with an empty list of translations and a form to request
new translations.
2. In the **Text to translate** field, enter some text to translate, for example, `Hello, World`.
3. Select a language from the drop-down list that you want to translate the text to.
4. Click **Submit**.
5. To refresh the page, click **Refresh** . There is a new row in the translation list. If you don't see a translation, wait a few more seconds and try again. If you still don't see a translation, see the next section about debugging the app.
## Debugging the app
If you cannot connect to your App Engine app or don't see new
translations, check the following:
1. Check that the `gcloud` deploy commands successfully completed and didn't output any errors. If there were errors (for example, `message=Build failed`), fix them, and try [building and deploying the Cloud Run app](https://docs.cloud.google.com/php/getting-started/background-processing.md.txt#building_and_deploying_the_backend) and [deploying the App Engine app](https://docs.cloud.google.com/php/getting-started/background-processing.md.txt#deploying_the_web_app) again.
2. In the Google Cloud console, go to the Logs Explorer page.
[Go to Logs Explorer page](https://console.cloud.google.com/logs/query)
1. In the **Recently selected resources** drop-down list, click **GAE Application** , and then click **All module_id** . You see a list of requests from when you visited your app. If you don't see a list of requests, confirm you selected **All module_id** from the drop-down list. If you see error messages printed to the Google Cloud console, check that your app's code matches [the code in the section about understanding the web app](https://docs.cloud.google.com/php/getting-started/background-processing.md.txt#understanding_the_web_app).
2. In the **Recently selected resources** drop-down list, click **Cloud Run Revision** , and then click **All logs**. You should see a POST request sent to your deployed app's URL. If not, check that the Cloud Run and App Engine app are using the same Pub/Sub topic, and that a Pub/Sub subscription exists to push to your Cloud Run endpoint.
## Clean up
To avoid incurring charges to your Google Cloud account for the resources used in this
tutorial, either delete the project that contains the resources, or keep the project and
delete the individual resources.
### Delete the Google Cloud project
> [!CAUTION]
> **Caution** : Deleting a project has the following effects:
>
> - **Everything in the project is deleted.** If you used an existing project for the tasks in this document, when you delete it, you also delete any other work you've done in the project.
> - **Custom project IDs are lost.** When you created this project, you might have created a custom project ID that you want to use in the future. To preserve the URLs that use the project ID, such as an `appspot.com` URL, delete selected resources inside the project instead of deleting the whole project.
1. In the Google Cloud console, go to the **Manage resources** page.
[Go to Manage resources](https://console.cloud.google.com/iam-admin/projects)
2. In the project list, select the project that you want to delete, and then click **Delete**.
3. In the dialog, type the project ID, and then click **Shut down** to delete the project.
### Delete the tutorial resources
1. Delete the App Engine app you created in this tutorial:
1. In the Google Cloud console, go to the **Versions** page for App Engine.
[Go to Versions](https://console.cloud.google.com/appengine/versions)
2. Select the checkbox for the non-default app version that you want to delete.
> [!NOTE]
> **Note:** The only way you can delete the default version of your App Engine app is by deleting your project. However, you can [stop the default version in the
> Google Cloud console](https://console.cloud.google.com/appengine/versions). This action shuts down all instances associated with the version. You can restart these instances later if needed.
>
>
>
> In the App Engine standard environment, you can stop the default version only if your app has
> manual or basic scaling.
>
3. To delete the app version, click **Delete**.
2. Delete the Cloud Run service you deployed in this tutorial:
```bash
gcloud run services delete background-processing-function
```
You can also delete Cloud Run services from the
[Google Cloud console](https://console.cloud.google.com/run).
3. Delete other Google Cloud resources created in this tutorial:
- [Delete the Pub/Sub topic `translate`](https://docs.cloud.google.com/pubsub/docs/admin#pubsub-delete-topic-gcloud)
- [Delete the Pub/Sub subscription `run-translate-string`](https://docs.cloud.google.com/pubsub/docs/admin#delete_subscription)
- [Delete the container image](https://docs.cloud.google.com/container-registry/docs/managing#deleting_images) named `gcr.io/PROJECT_ID/background-processing` from Container Registry.
- [Delete the invoker service account `cloud-run-pubsub-invoker@PROJECT_ID.iam.gserviceaccount.com`](https://docs.cloud.google.com/iam/docs/creating-managing-service-accounts#iam-service-accounts-delete-gcloud)
## What's next
- [Learn more about App Engine](https://docs.cloud.google.com/appengine/docs/standard/php7).
- [Handle sessions with Firestore](https://docs.cloud.google.com/php/getting-started/session-handling-with-firestore.md.txt).
- [Deploy an app to Compute Engine](https://docs.cloud.google.com/php/tutorials/getting-started-on-compute-engine).
- [Deploy an app to Google Kubernetes Engine](https://docs.cloud.google.com/kubernetes-engine/docs/quickstarts/deploy-app-container-image).
- [Authenticate users with IAP](https://docs.cloud.google.com/php/getting-started/authenticate-users.md.txt).